Swansea City picked up their 7th win and kept their 8th clean sheet of the season away at struggling Bolton Wanderers on Saturday afternoon thanks to a wonder-strike from winger Barrie McKay.
The former Nottingham Forest man struggled for form after showing plenty of promise on the opening day at Sheffield United but since he has been little more than a spectator. A spell out of action seems to have done him the world of good as he put in a good first-half performance that he rounded off with a superb strike from the corner of the penalty area.
The game saw a similar pattern to the one before it at Rotherham United where Potter’s side dominated and dictated proceedings with 64% first-half possession and two ‘big chances’ missed. Bolton’s only real chance came from a long, 30-yard strike from Ameobi that tested Erwin Mulder who came back in goal ahead of Kristoffer Nordfeldt.
Other first-team changes came in defence as Olsson and Naughton dropped to the bench and Roberts and Grimes both dropped to full-back. Leroy Fer started to captain the side in midfield alongside Jay Fulton.
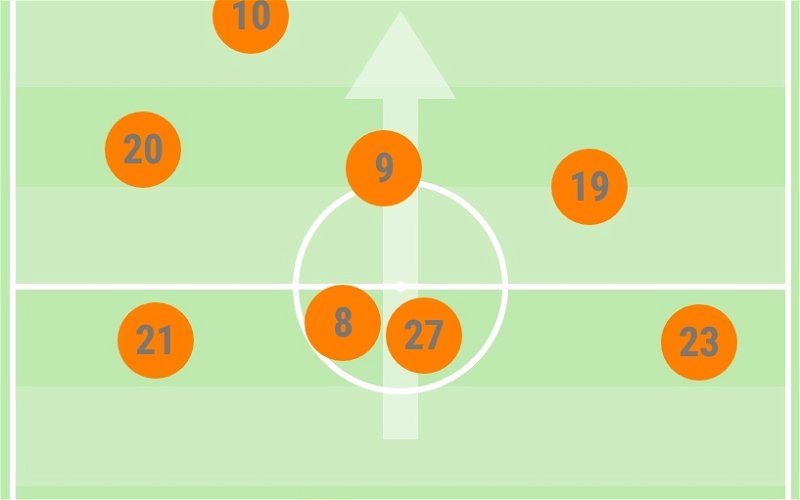
Swansea City Average Team Shapes First Half vs Overall
The maps below show the average team shapes for the Swans in the first half (left) compared to the overall, full match average (right).
With Roberts dropping back into the right-back spot and McKay starting in front of him, McKay offered more attacking threat inside while we’ve seen Roberts stick to his wide role when playing as a winger. There were moments in the game when the Swans preferred to attack through the middle and this saw both James and McKay moving inside and providing a close attacking unit of four with James, McBurnie, Celina and McKay.
Bolton were often getting players back in defensive support and crowding us out in our attempts to play around them in and around the penalty area so we always looked more threatening when we looked to quickly release the wide runners of James and McKay.
You can see below in the first image how forward Celina (10) was playing and there were moments when he played as a false nine. McKay played a superb lobbed pass through to him but he wasn’t able to beat the goalkeeper after bringing the ball down well with a decent first touch.
Celina was all over the pitch, sometimes linking up down the left with James, playing as a standard number 10 with McBurnie as well as shifting wide right too. There’s definitely no strict role for Celina who’s seemingly allowed to drift across – usually where the ball goes he follows when inside the final third.
Celina’s position changes and his deeper involvement in the second half sees his overall average position deeper and more central after the second half which saw far less in terms of attacking third action as Bolton upped their efforts after a rather poor first half showing.
Grimes’ (21) position only changes to be more central as he moved into midfield when Olsson came on.


Overall Team Shape vs Subs Impact
Swansea City weren’t able to maintain their first-half momentum in the second half as Bolton pushed further forward and were reluctant to have a defensive line sitting so deep, almost inviting the pressure from the visitors.
Our first change saw Olsson coming on for McKay who suffered a head injury during the first half. The substitution saw Grimes move into a deep-lying midfield role. For about quarter of an hour, we had Grimes sitting deep with Fer and Fulton either side and in front of him. With McKay now missing on the right, Celina and McBurnie covered this hole.
Later, within four minutes of each other, Montero replaced Dan James and Bony came on for Celina. You can see in the average positions map below right how Olsson (3) averaged an attacking position down the left with Montero (7). Bony’s touches were mostly defensive deep ones so he averaged a deep position near the centre spot. McBurnie’s touches in the final half an hour show him playing mostly in the wide right channel in McKay’s absence.

Bolton’s Average Team Shapes
The average position maps below show Bolton’s team shape with the overall shape on the left and their substitutes included on the right.
Bolton’s first changes came midway through the second half with Noone (12) replacing Buckley (11) and Donaldson (8) making way for Magennis (28). These were like for like changes that didn’t really change the dynamic too much for the home side and after Ameobi’s poor miss from inside the box, Mulder and the defence were rarely under serious threat. Their final switch saw Doidge (9) come on for Taylor (3) as Parkinson finally made a more bolder sub, taking off a left back for a striker. With our pace now gone from our right, it was a change that the Bolton boss could afford to make with 9 minutes remaining of normal time.


There were some more positives on display from the Swans – mainly the first half once again. We were on the front foot, played some excellent and confident attacking football. To make a passing style work you have to have a number of players operating within close proximity of each other and the Swans got this right in the first 45. As mentioned earlier, there were times when the wingers both tucked in to create this dynamic that allowed us to quickly link-up our passes in Bolton’s half. We showed great flexibility, one moment saw Grimes moving out of his left-back role and into midfield to link-up the play which meant Fulton dropped back as defensive cover.
Again, an obvious criticism would be our missed chances but thankfully this week we got the win but with tougher opposiiton coming up, we can’t afford to keep missing chances when we’re up against the likes of Derby and Norwich City.